
With plans for job seekers, recruiters, salespeople and businesses, LinkedIn premium subscription options have something for everyone.
The Premium Career plan is perfect for job seekers who want to further build on their careers while the LinkedIn Learning plan can help anyone improve their skills and learn new ones. Premium Business is perfect for those who need detailed business insights to further expand on their business while the Recruiter plans help talent acquisition specialists find and hire talent.
And then we arrive at our personal favorite, perfect for salespeople, LinkedIn Sales Navigator, that should help you contact accounts outside your network, boost lead generation and increase sales in no time — as long as you’re using it in the best way possible.
Today, we’ll help make sure that is the case. Let’s start from the beginning.
What is LinkedIn Sales Navigator?
LinkedIn Sales Navigator is a premium tool designed to help sales professionals find and connect with potential customers on LinkedIn, the world’s biggest social media platform.
It provides a variety of tools that are specifically designed for sales, such as advanced search capabilities, personalized recommendations, and the ability to track and analyze interactions with prospects. Available as a subscription service, and it is designed to be used in conjunction with a LinkedIn account.
Some key features of LinkedIn Sales Navigator include advanced search capabilities with more than 20 filters, the ability to send InMail to users who are not already in your contact list, job change notifications, access to LinkedIn groups, lead recommendations based on search history and interactions, the ability to search for content posted by potential customers, the ability to add tags and notes to potential customers in your feed, the ability to use Boolean search to combine keywords with operators, and the ability to save search results for later use.
1) Advanced search capabilities: Sales Navigator allows users to search for prospects using a variety of criteria, such as company, industry, location, and job title.
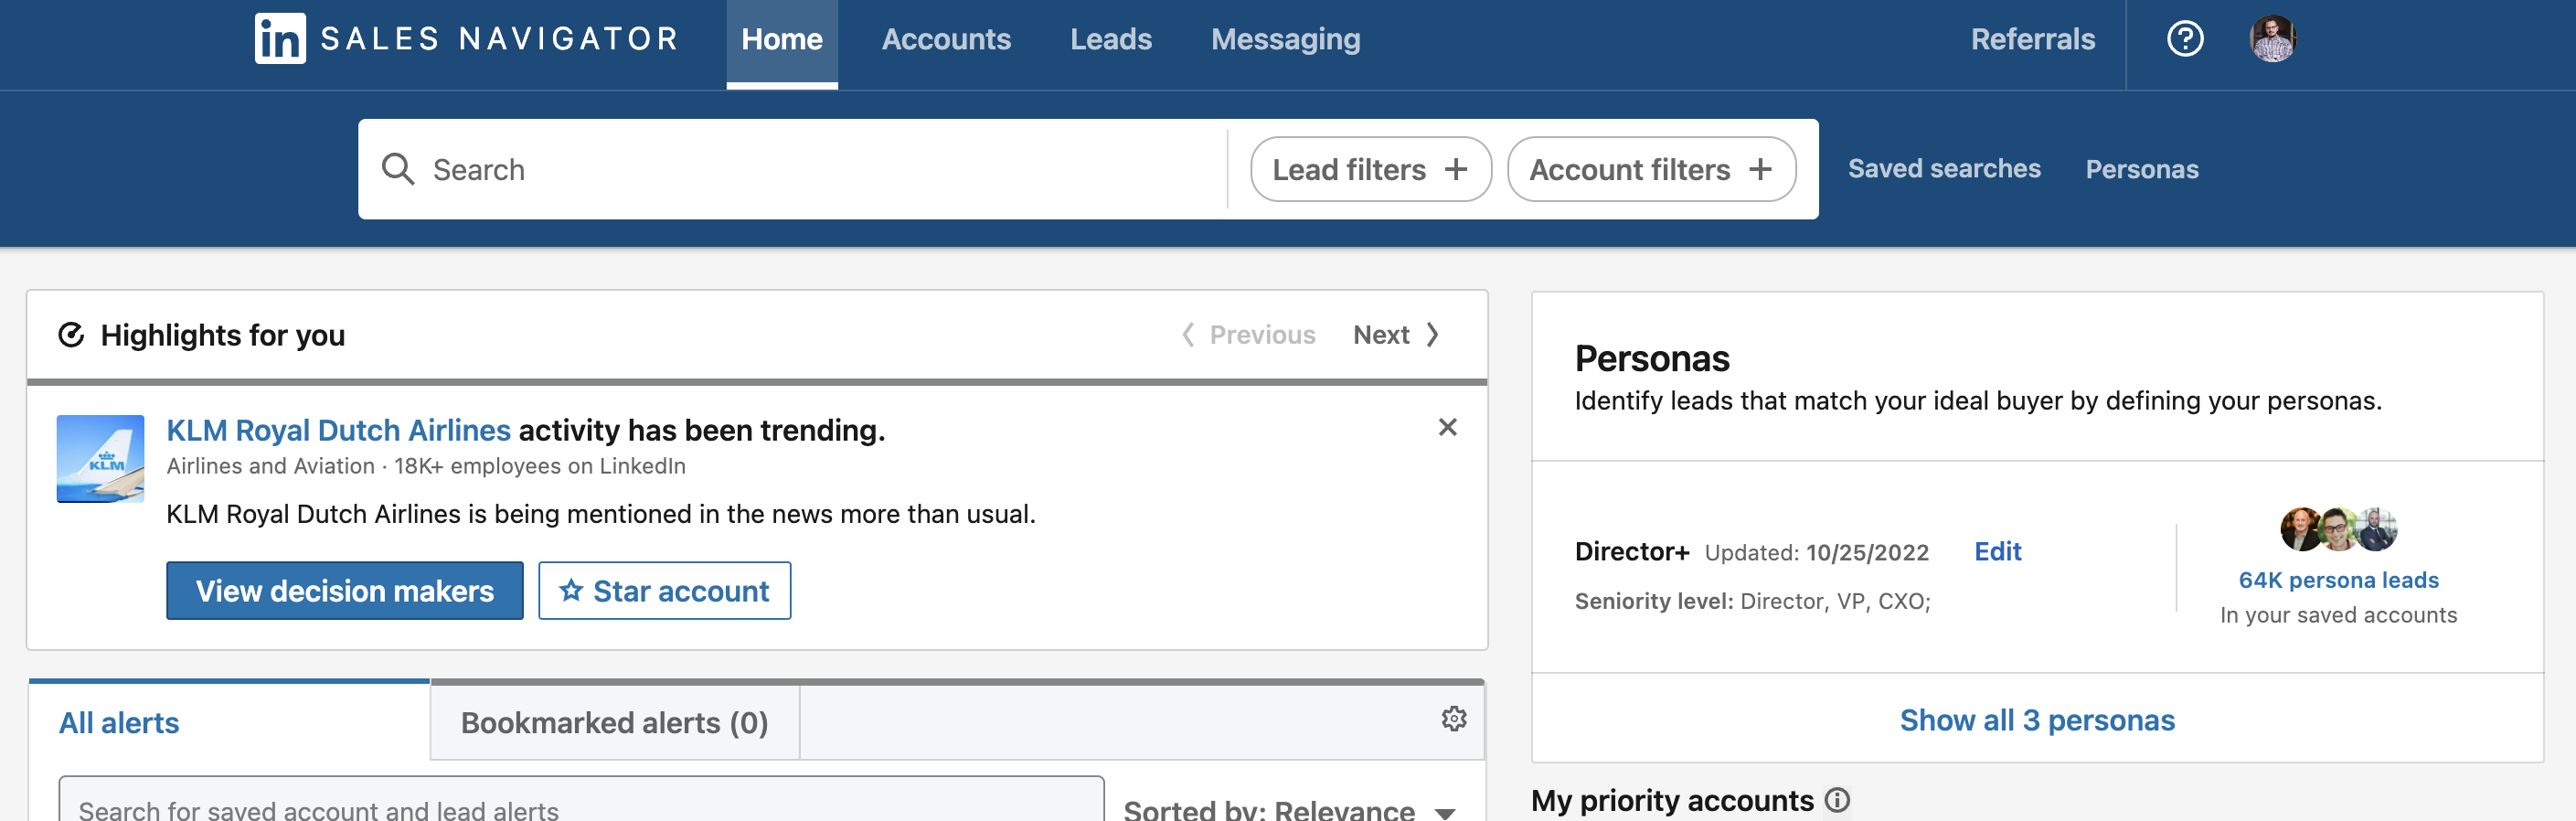
One of the most special filters of Sales Navigator is the Search Spotlight.
This feature allows you to surface prospects who are more likely to engage with you based on specific criteria, such as recent job changes or shared experiences.
For example, if you are looking to target professionals who have recently switched jobs, you can use the Search Spotlight feature to find these individuals. Similarly, if you want to connect with prospects who have shared experiences with you, such as attending the same conference, you can use the Search Spotlight feature to find these individuals.
Lastly, Spotlight allows you to search specifically for members who have recently been active on the platform, which increases the likelihood of them seeing and responding to your outreach. This feature is particularly useful for reaching out to prospects who are more likely to be engaged and interested in your products or services.
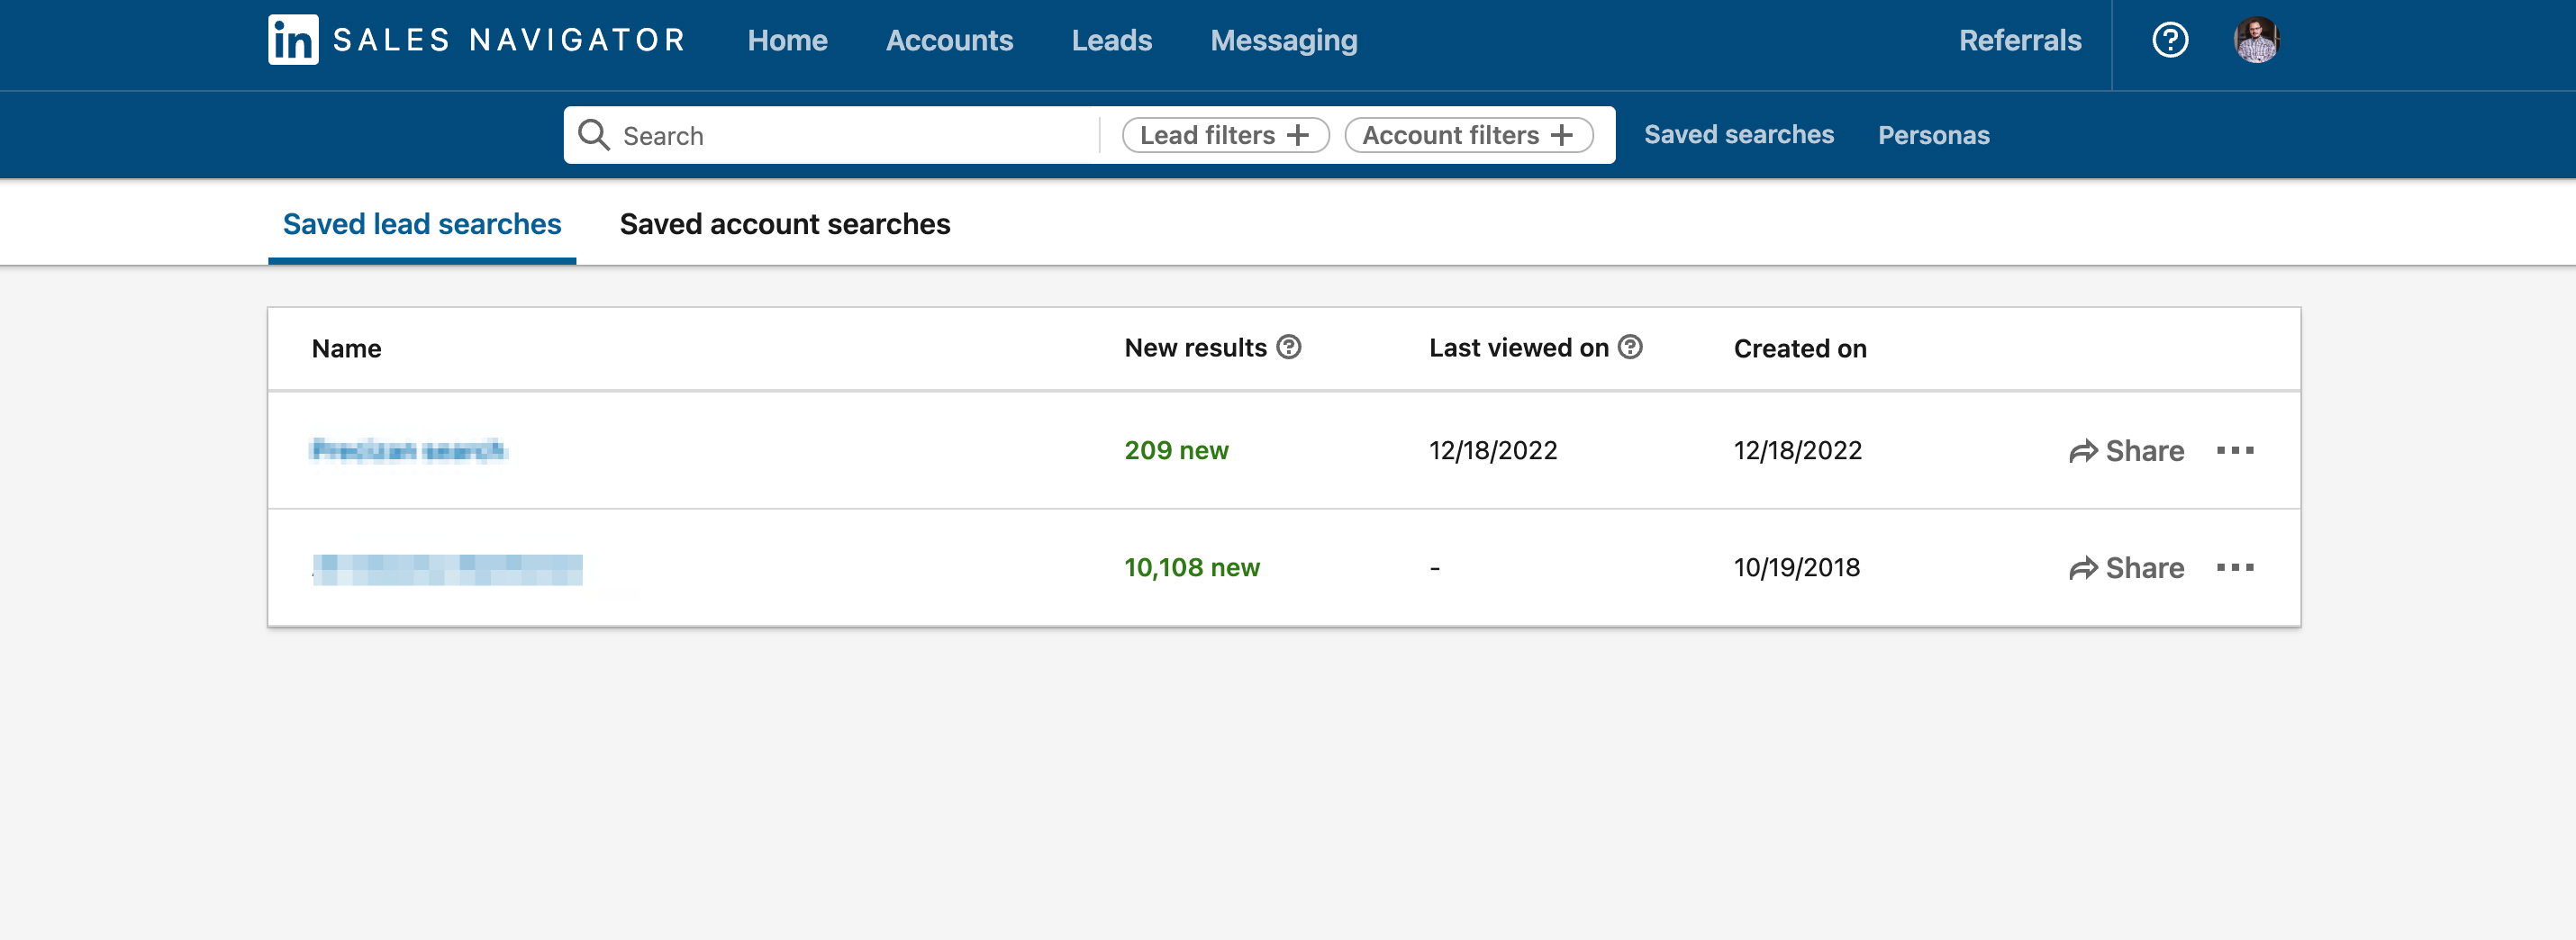
And don’t forget about the “Save search” feature! Once you have established and fine-tuned your search criteria, you can save it by clicking the “Save Search” button in the upper-right corner of the page.
By saving your search, you can easily access it again in the future, and even give it a name for easy identification. Additionally, you can set up alerts to notify you of new leads that match your criteria on a daily, weekly, or monthly basis.
This can become a valuable resource for finding new qualified prospects, especially when people are frequently changing roles and jobs. By having your best searches saved, you can have a consistent flow of new leads from searches you have already refined to fit your buyer persona.
2) Personalized recommendations: Sales Navigator uses machine learning algorithms to recommend potential customers based on the user’s search history and other activity on LinkedIn.
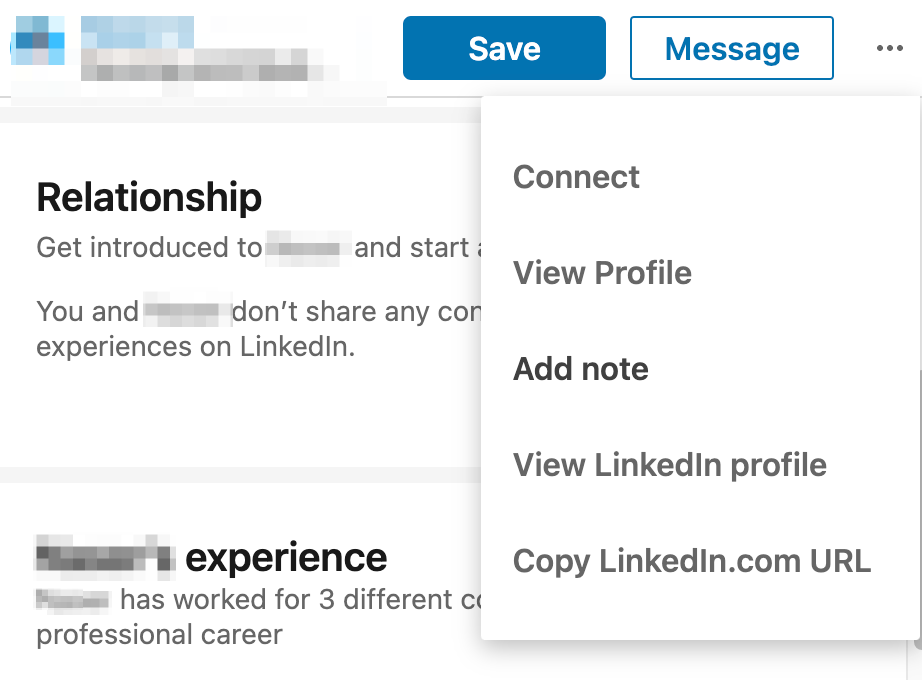
Sales Navigator provides a function that allows you to find similar leads to the ones you are currently pursuing. To access this feature, simply click the drop-down button on a lead you are viewing and then select “View similar”.
This will generate a list of leads with similar job titles or roles, which can help you to focus your sales efforts on decision-makers and minimize the time spent trying to find the right person in a company.
You can also access the Recommend Leads list which will provide you with an automatically generated list of up to 100 contacts, listing prospects that you may not have stumbled upon otherwise.
You can find the list created based on your past activity and buyer intent signals in the Leads List tab.
3) Interaction tracking: Sales Navigator allows users to track and analyze their interactions with prospects, including messages and connections.
This feature allows users to see when they last interacted with a lead, what actions were taken, and what the outcome was. This information can be used to inform sales and marketing strategies, as well as to track progress and measure the effectiveness of these strategies.
With Interaction Tracking, you can log activities like sending InMail, connecting with someone, or even just visiting their profile.
Additionally, you can also track custom interactions such as phone calls, emails, or in-person meetings. This information can be used to understand which interactions are most effective in moving a lead through the sales funnel, and can also be used to set goals and measure progress towards achieving those goals.
The interaction history is visible to you and your team members, so you can collaborate and share your insights on the best way to move a lead forward.
You will be able to access the Interaction Tracking feature by navigating to the Lead or Account details page. There you will find a section called Interaction History, where you can see a log of all your interactions with that lead or account, including the date, type of interaction, and the outcome.
Alternatively, you can also find the interaction information in your Sales Navigator inbox, where you will find all the InMails, connection requests, and other interactions you’ve had with your leads. You can filter the interactions by date, type, and outcome and also you will be able to see the interaction history from the Leads or Accounts list view.
4) LinkedIn InMail: Sales Navigator allows users to send InMail to potential customers who are not already in their contact list. This can be a useful way to make new connections and find new leads.
That being said, you should try to keep sending InMails to a minimum.
It’s likely it has been a while, or never, that you’ve read someone’s InMail — as InMail on LinkedIn is often perceived as overly salesy and not personal.
Therefore, we recommend to use InMail sparingly through LinkedIn Sales Navigator, such as only when you’re having difficulty getting a prospect to accept your connection request.
If a prospect does accept your request, you can go to their profile on LinkedIn Sales Navigator, click on “View on LinkedIn” and then send a message that looks like a regular direct message. This approach can be more effective in engaging your prospects.
5) Access to LinkedIn groups: LinkedIn Sales Navigator provides access to a wide range of LinkedIn groups that may be relevant to the user’s target audience. These groups can be a valuable resource for building relationships and finding new prospects.
By joining and actively participating in these groups, you can connect with other professionals in your industry, as well as potential customers. This can help you to establish yourself as a thought leader in your field and gain visibility for your business.
Additionally, by joining groups that are relevant to your target audience, you can gain insight into the challenges and pain points that your prospects are facing, which can help you to tailor your sales and marketing strategies to better meet their needs.
Participating in these groups also gives you an opportunity to share your own knowledge and expertise, by answering questions or posting content that is relevant to the group. This can help you to build trust and credibility with other members of the group, which can lead to more opportunities for networking and business development.
You can also use the search function within Sales Navigator to find specific groups that match your target audience, industry, and location. This allows you to narrow down your search and find groups that are most likely to be of value to you.
6) Prospect tagging: Users can add tags and notes to potential customers to ensure you never forget the details related with each person.
With this feature, you can add tags to a prospect’s profile that help you to classify and identify them based on specific criteria, such as industry, job title, or location. You can also add notes to a prospect’s profile that provide additional information about the prospect or your interactions with them. This can include details such as the last time you contacted them, the outcome of the interaction, or any specific questions or concerns that they may have.
Prospect tagging feature can also be used in collaboration with your team members, they can add tags and notes to prospect’s profile and you can have a clear understanding of the current status of the lead and next steps. This can help to avoid duplication of effort and ensure that everyone on your team is aware of the current status of each prospect.
Prospect tagging can be accessed through the Sales Navigator platform and can be found on the Lead or Account details page. It allows you to quickly and easily find and filter through your prospects based on the tags and notes that you’ve added to their profiles, which can save you time and help you to stay organized.
Overall, LinkedIn Sales Navigator is a powerful tool that makes it easier to find and connect with potential customers on LinkedIn. It is designed to make the sales process more efficient and effective so that you can up your sales game in no time.
Benefits of using LinkedIn Sales Navigator
👉 Contact leads who aren’t in your connections list
Sales Navigator lets you send LinkedIn messages to leads that aren’t already in your contact list. Since it is impossible to do this on a free version of LinkedIn, it may very well be the biggest benefit you’d get.
This feature is particularly useful for new users who are just starting to build their network on LinkedIn. With Sales Navigator, they have access to more profiles than they would with the free version, which means they can identify and reach out to more potential leads.
The LinkedIn profile search limit is determined by the type of account you have. A free LinkedIn account allows you to search up to 1000 profiles, which is equivalent to 100 pages of 10 results. However, if you upgrade to Sales Navigator, you will be able to search up to 2500 profiles, equivalent to 100 pages of 25 results — thus helping you easily contact leads and build your network.
👉 Easily identify new leads and decision makers within companies
Take your ideal customer profile and buyer persona documents, use over 20 search filters that Sales Navigator providers, and easily identify new leads and decision makers within your target companies.
Additionally, Sales Navigator allows unlimited people search which isn’t the case if you’re using a free LinkedIn account.
A free LinkedIn account has a monthly commercial use limit of around 300 searches. Once this limit is reached, you will no longer be able to conduct any further searches on the platform until the next month.
With Sales Navigator in your arsenal, search as much as you’d like and build your leads list!
👉 Never run out of new leads with personal recommendations
Based on your history and other activity on LinkedIn, you’ll receive new lead recommendations ensuring that you never run out of leads.
When you’re on a target lead’s profile, use the “View similar” option to get lead recommendations, or go into your Lead Lists and check out the automatically generated list of Recommended Leads from LinkedIn.
In addition, Sales Navigator also gives you access to various LinkedIn groups that may be relevant to your target audience. This is a great way to find new prospects and build relationships.
Participate in discussions, answer questions, and share your expertise. In this way, you can build your “street cred”. The prospects from the group will definitely grow more open to you, and some may even contact you themselves.
👉 Easily create an informed sales process
Sales Navigator tracks your interactions, including profile visits, messages, and connections, thus helping you to create an informed sales process based on data. It also provides a feature that allows users to save prospects to specific lead lists. This feature is extremely helpful in organizing and keeping track of potential customers.
When you save a prospect to your lead lists, you can easily monitor their activities on the platform and through “Alerts”, such as their posts, shares, likes, comments, and even job updates. This can help you to stay up-to-date with the latest developments in the lives of your prospects, and can also provide valuable insights into their interests and concerns.
This makes it easy to interact with your prospects by being able to quickly respond to their posts and comments so that you build and maintain relationships with your prospects in a more personal and meaningful way.
Additionally, this feature allows you to keep a close eye on your prospect’s job updates, whether they got promoted, changed the job, or moved to another company. Use this to adapt your sales pitch and messaging accordingly.
👉 Never lose track of your prospects
You can even use Sales Navigator as a lightweight CRM. Add tags and notes to your potential clients so that you never lose track of the fine details and great ideas, and maximize your conversion rates.
How to access LinkedIn Sales Navigator?
1) To access LinkedIn Sales Navigator, you will need to have a LinkedIn account and purchase a Sales Navigator subscription. Here are the steps you can follow to access LinkedIn Sales Navigator:
2) Go to the LinkedIn website and log in to your LinkedIn account.
3) Click on the “Work” dropdown menu in the top navigation bar, and select “Sales Navigator” from the list of options.
4) If you do not have a Sales Navigator subscription, you will be prompted to purchase one. You can choose from a variety of subscription options, depending on your needs and budget.
Once you have purchased a Sales Navigator subscription, you will be able to access the Sales Navigator dashboard and start using the tool.
If you encounter any issues accessing LinkedIn Sales Navigator, you can find a variety of useful content online that should be of help or simply contact LinkedIn customer support for assistance.
LinkedIn Sales Navigator Pricing
The cost of LinkedIn Sales Navigator varies depending on the subscription plan that you choose.
LinkedIn Sales Navigator offers both yearly and monthly subscription plans. The cost of a yearly subscription is typically lower than the cost of paying for a monthly subscription on a monthly basis. It’s a great choice for the budget-conscious small businesses.
LinkedIn Sales Navigator offers three subscription plans:
1. Lite: This plan costs $64.99 per month or $599 per year and includes basic search and lead recommendation features. It’s perfect for small businesses, solopreneurs, sales people that are working solo and /or paying for their own account. It’s also great for any C-level executive and founder, owner willing to be more visible on LinkedIn and working on expanding their network.
2. Professional: This plan costs $79.99 per month or $799 per year and includes advanced search and lead recommendation features, as well as the ability to send InMail to users who are not already in your contact list. This would be a better plan once you have set your sales goals and have a sales process in place and the next step is to scale your outreach, connections or lead generation.
3. Team: This plan costs $134.99 per month or $1,349 per year and includes all of the features of the Professional plan, as well as the ability to add additional users to the account and access to team-specific analytics and reporting tools. Great for teams within a bigger sales department and marketing department.
Purchasing a yearly subscription to LinkedIn Sales Navigator can be a cost-effective way to access the tool, especially if you plan to use it on a regular basis.
That being said, we recommend that you carefully consider your needs and budget before selecting a subscription plan.
How to use LinkedIn Sales Navigator to find leads
If you’re using LinkedIn Sales Navigator for the first time, it may seem overwhelming. But don’t worry, you’ll get a hang of it faster than you think.
To guide you in the right direction, we have prepared some steps that you can follow to find leads in LinkedIn Sales Navigator:
1. From the Sales Navigator dashboard, click on the “Search” tab to access the search tools.
2. Use the search filters to narrow down your search to specific criteria such as industry, location, and company size.
If you’re targeting a larger niche, we recommend that you use as many filters as possible to get the most precise leads. In cases where your niche is smaller, you’ll have to stick to a few of the main ones to avoid getting the annoying “no-results-found” page.
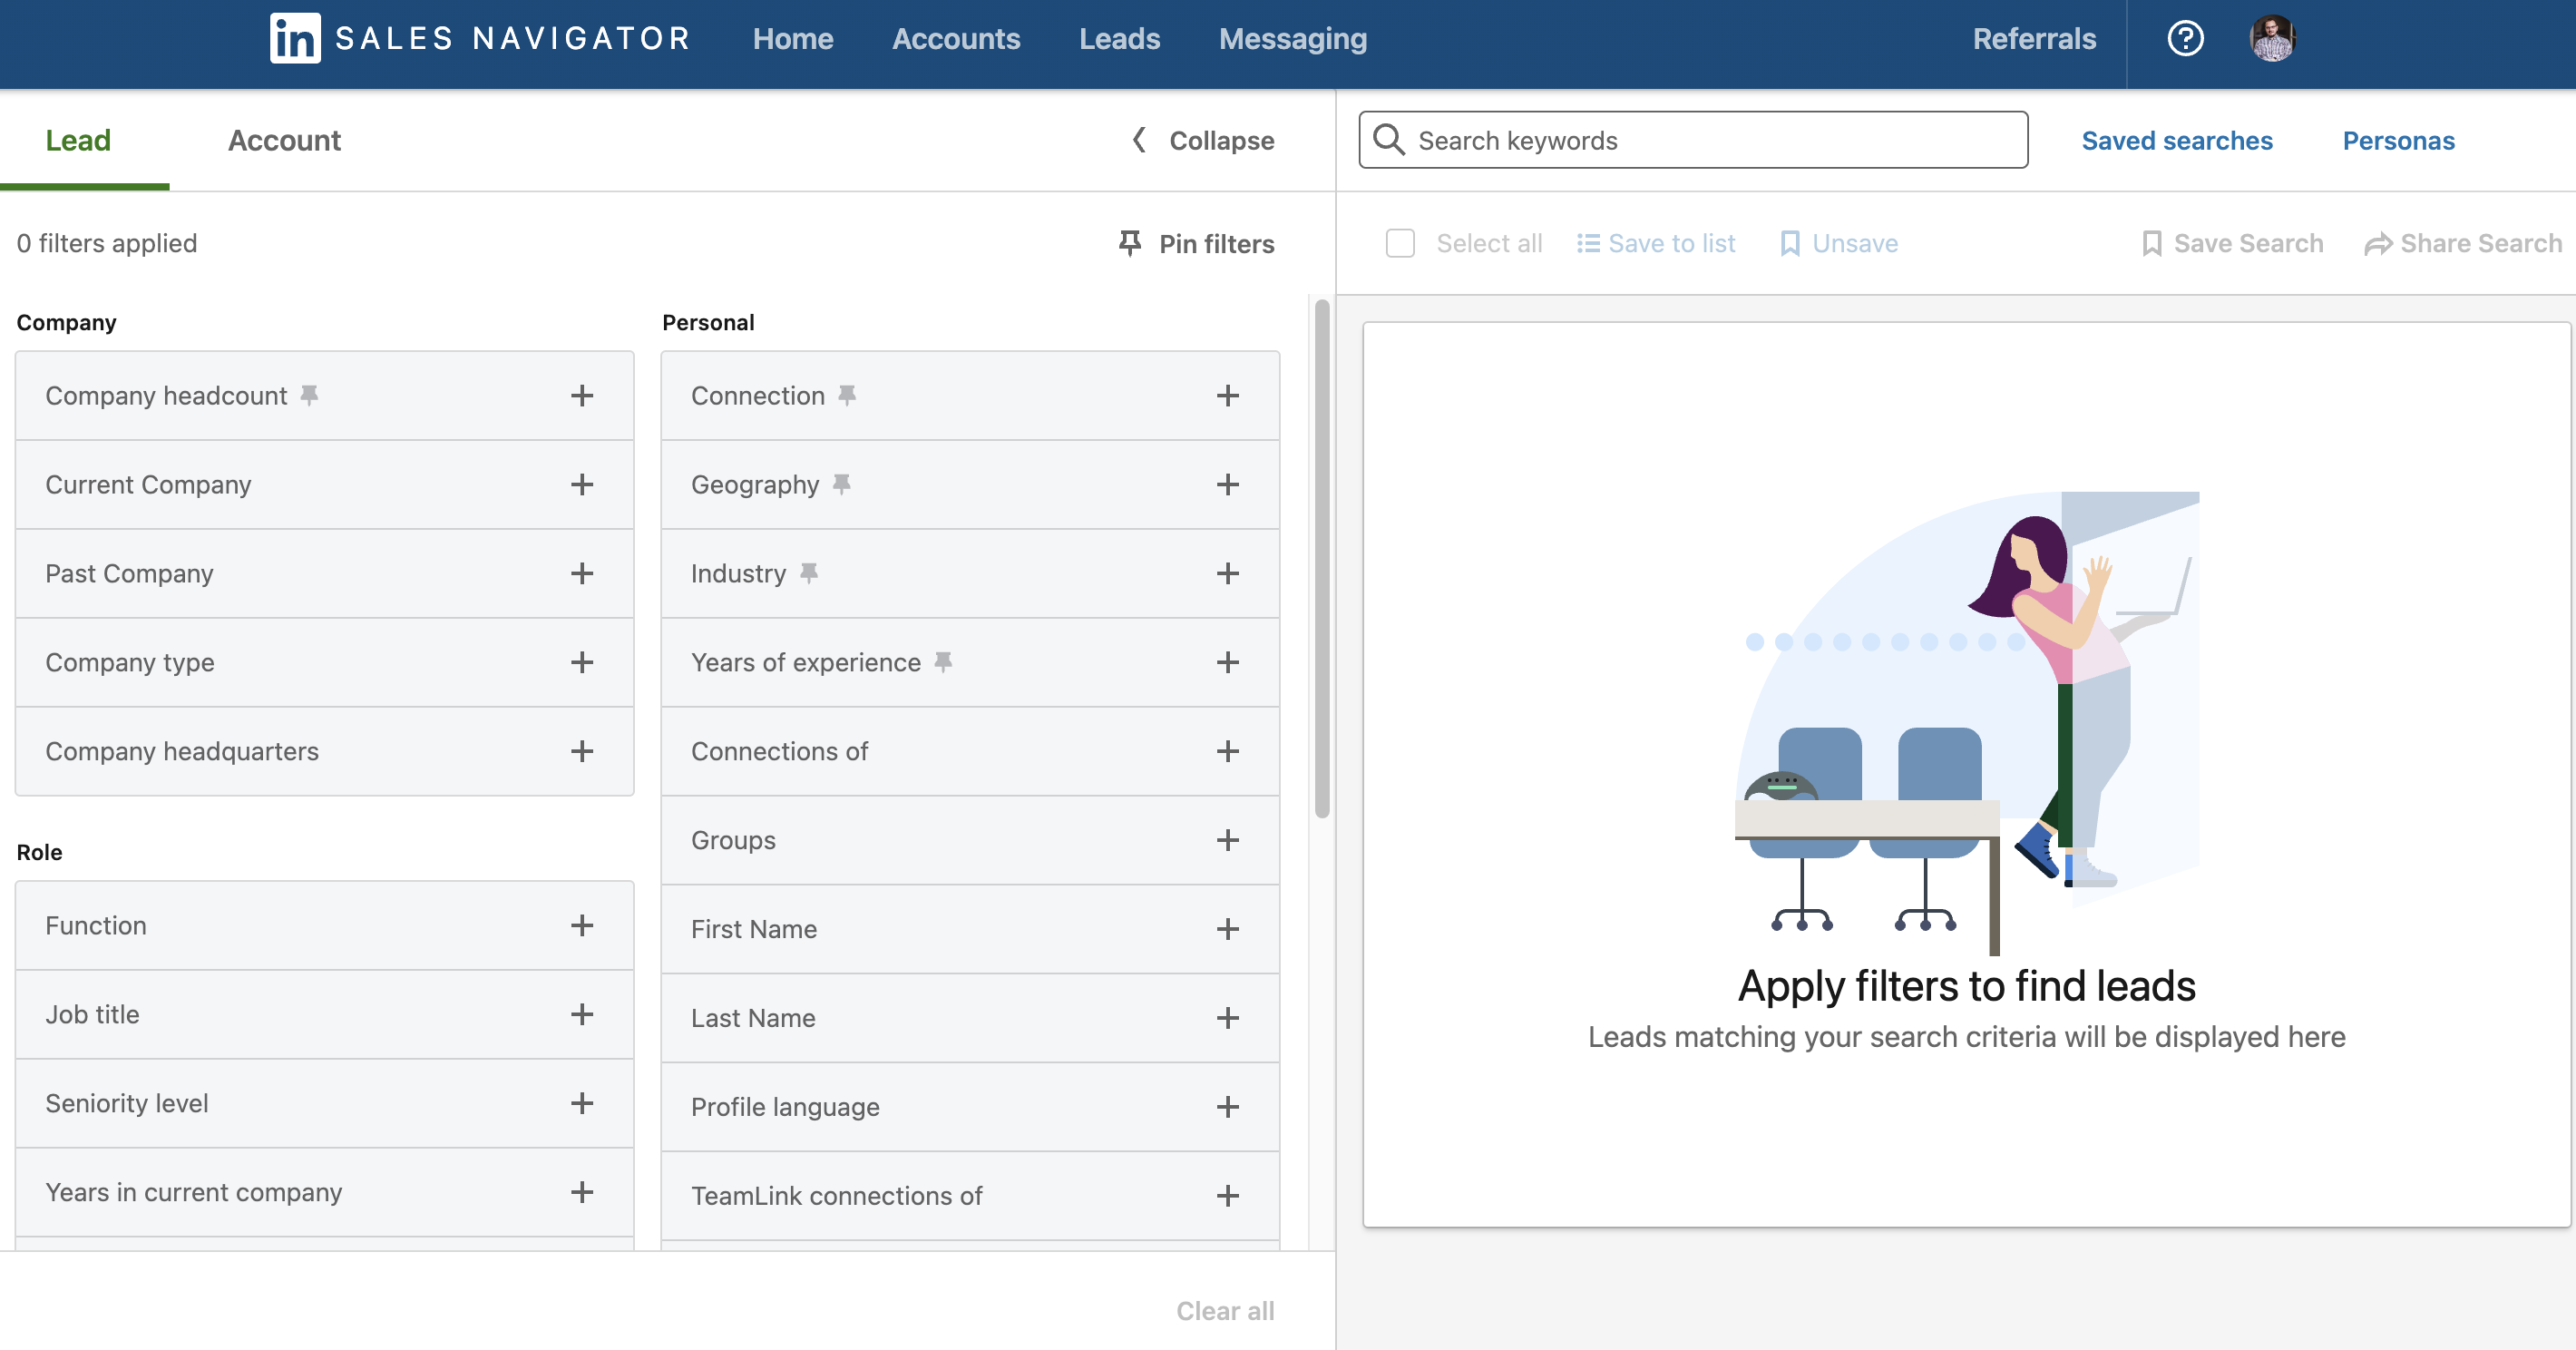
3. Click on the “Leads” tab to view a list of potential leads based on your search criteria.
4. Use the “Connect” button to send a connection request to potential leads.
5. Even before you connect with a potential lead, use the “InMail” button to send a message to them. Sometimes, getting your connection request accepted will require some carefully thought out selling 🙂
6. Noticed anything special or had a great idea? Use the “Tags” and “Notes” features for each potential lead in your feed to make sure you don’t forget it.
7. Don’t forget about the “Saved searches” feature. Use it and save search results that you can return to later.
Great — you may be thinking — but this is all LinkedIn-based. Is there a way for me to contact one of these prospects more directly via email or phone?
The answer is yes: at least two ways that we’ll discuss in the section below.
How to find LinkedIn Sales Navigator leads’ contact email and phone numbers
The first way to find contact email address and/or phone numbers of your LinkedIn Sales Navigator leads is to find them in the contact section of their LinkedIn profiles.

However, it’s important to note that users can choose whether or not to display these so the success rate of this method isn’t fairly high, to say the least. Additionally, the process is further complicated by differences between first-degree, second-degree and third-degree connections.
For first-degree connections, you may be able to find email addresses and phone numbers in the contact info section of their LinkedIn profile, as long as you are connected to the person and they have decided to share this information with their connections.
For second- and third-degree connections, the email discovery rate is even lower, as you will only be able to see their contact information if they have chosen to make it completely public. This is more likely to happen if the person is a salesperson or founder who is actively looking for business opportunities.
If you can find enough contact email addresses with this method, then great. If not, you’ll likely need to add another tool to your sales process. In this case, we’ll talk about the amazing ZeroIn.
How to use ZeroIn with LinkedIn Sales Navigator
Available as both a web app and browser extension, ZeroIn allows you to easily find verified business emails, phone numbers, and company information with just one click. It also includes a simple CRM system to help you organize and manage your potential leads.
It is important to note that it can be used with both Free and Sales Navigator LinkedIn profiles and matches your search results or individual profile views with our constantly griwing database. Zeroin database will provide you with not only the email address but also over 20 additional pieces of information about the contact and the company.
- The ZeroIn Chrome extension allows you to easily access to up to 26 pieces of information related to people on LinkedIn, including verified business emails.
- The extension’s unique 3-point verification system ensures that the email addresses you find are accurate and valid.
- You can use it to search for information on individual LinkedIn profiles or in bulk, and you can also upload existing email lists to the User Portal for re-verification.
- Additionally, you can export your leads in various formats, such as CSV, XLS, and Google Drive, and you can use the “single email verification” feature to quickly check if a specific email is still valid.
Using it to find your LinkedIn Sales Navigator lead contact email and/or phone number is quite simple:
1. Install the ZeroIn browser plugin for FREE
2. Open LinkedIn, and you should see the ZeroIn plugin on the right-hand side
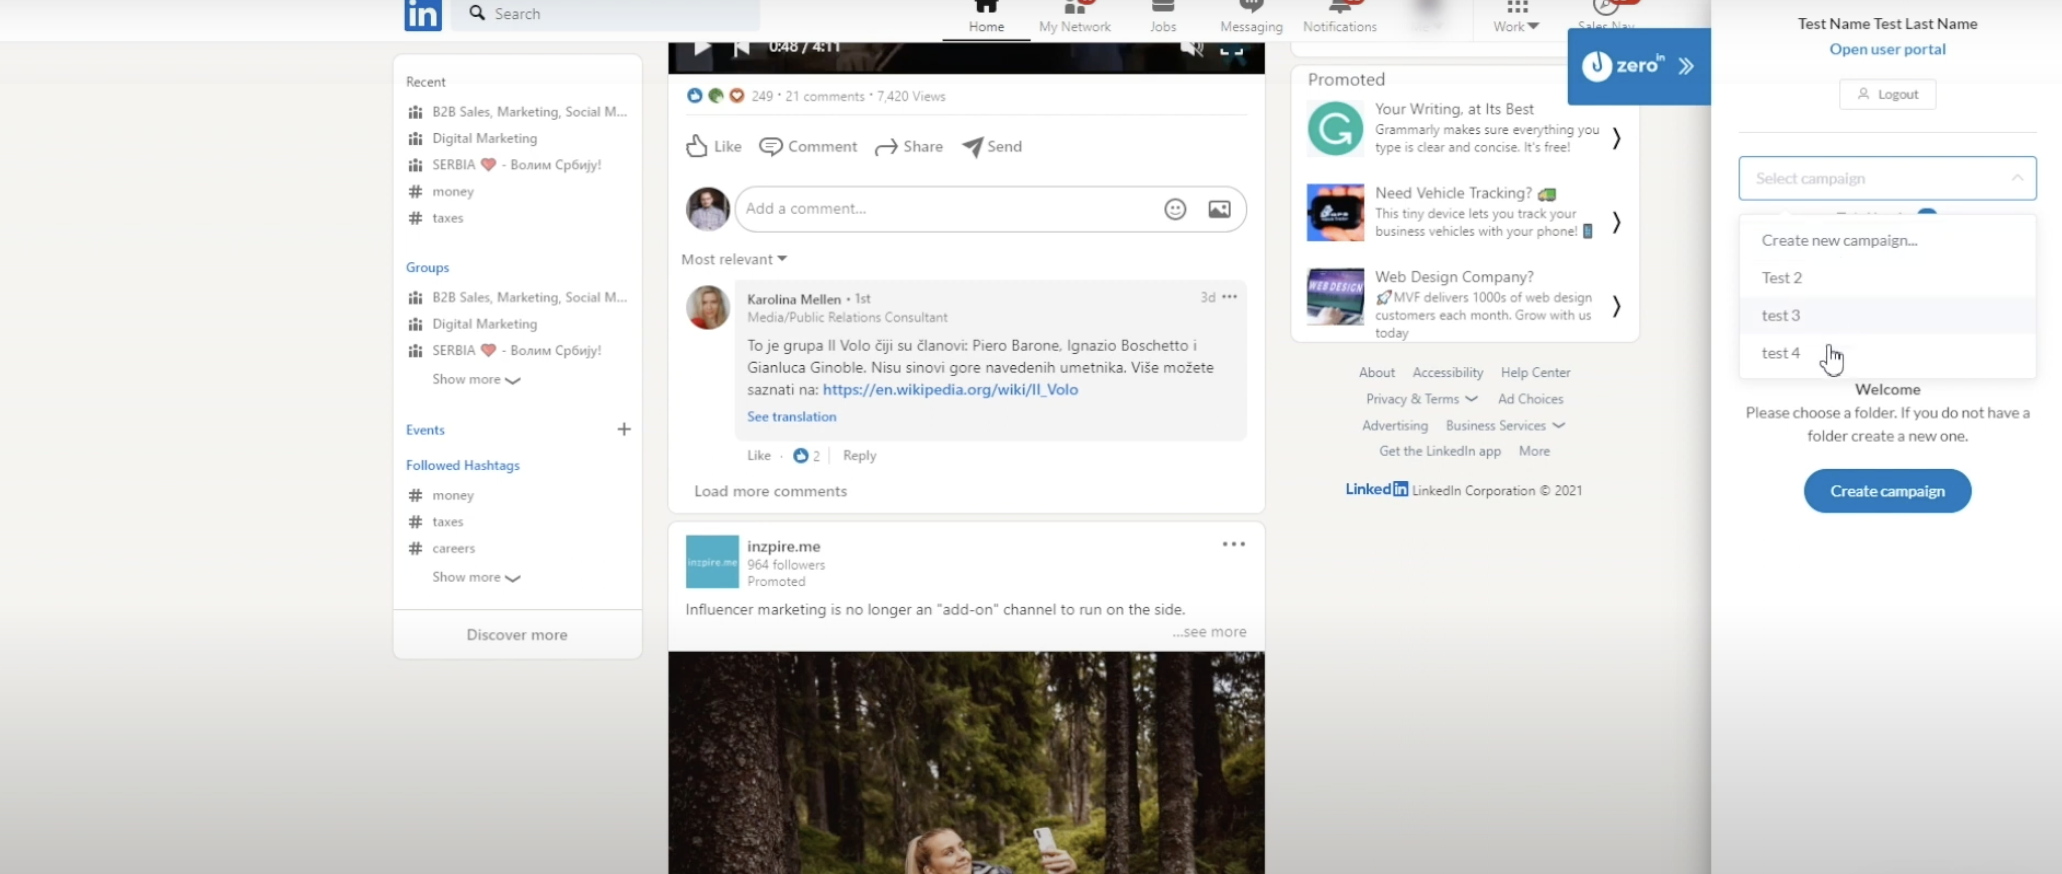
3. Before you start, choose or create a new campaign where you’ll save your leads contact data. Think of these campaigns as separate folders for different groups of contacts.
4. Go to the search page, find your lead and visit their profile.
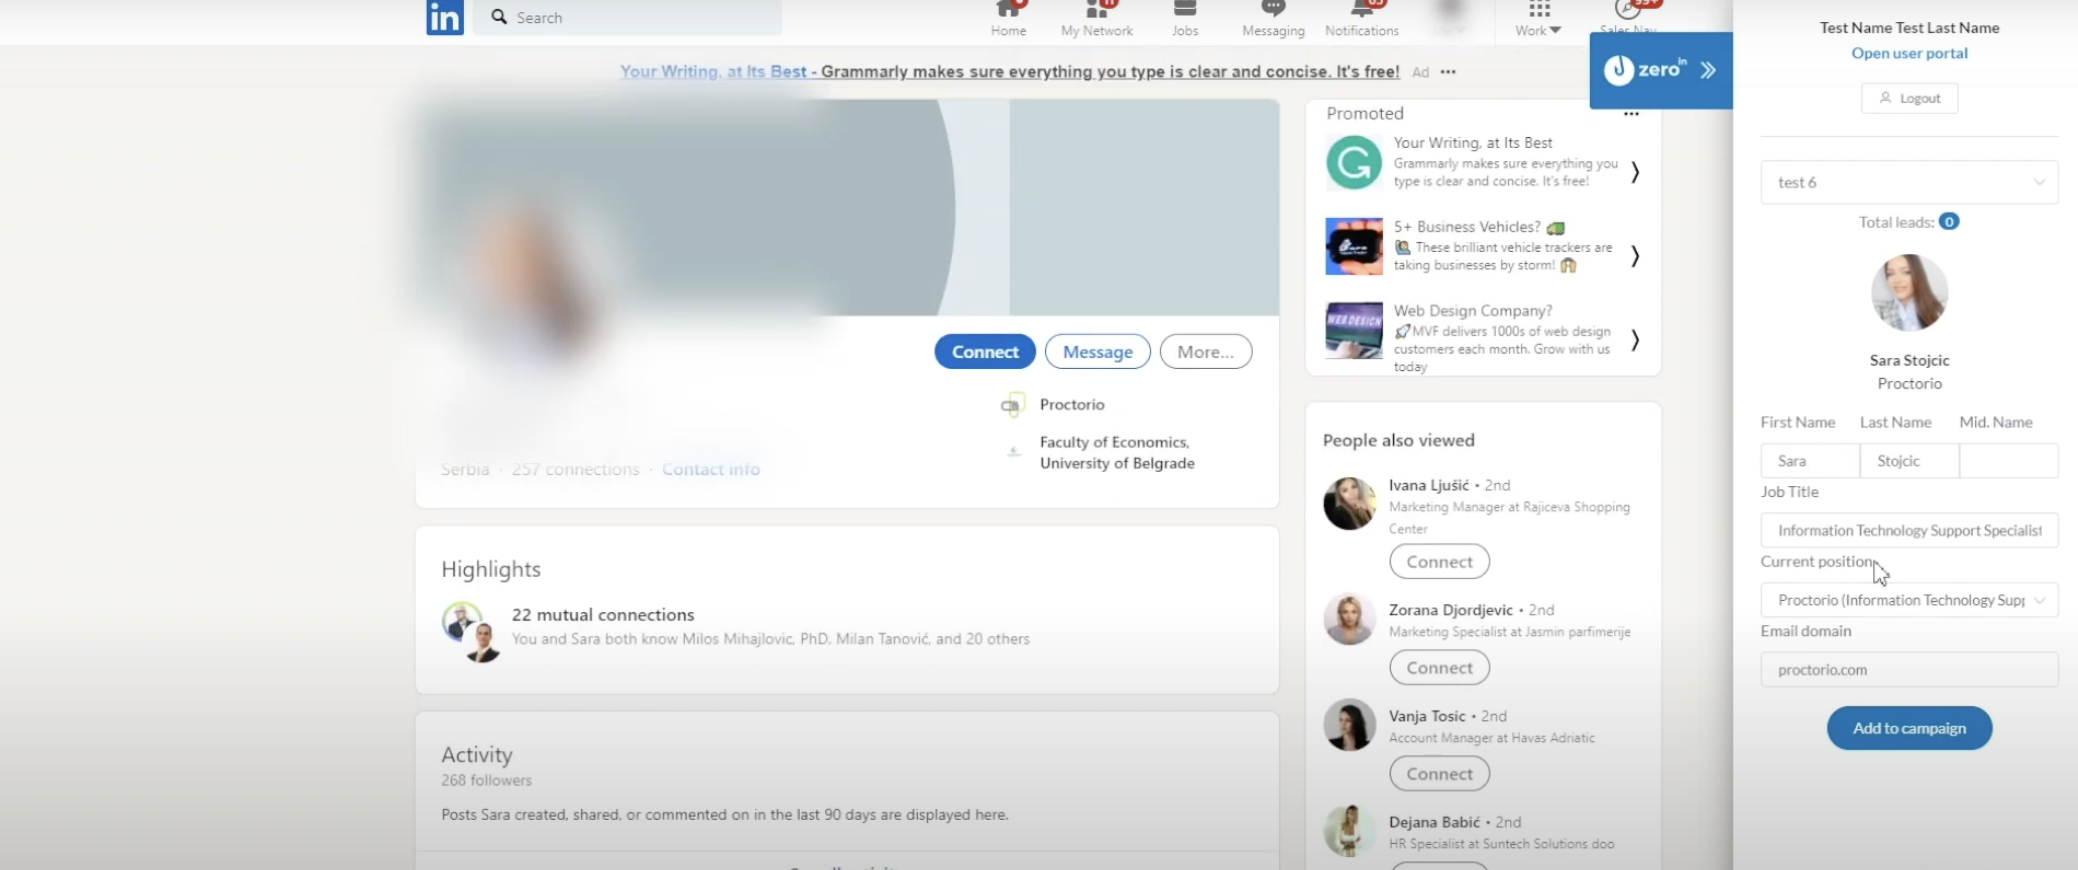
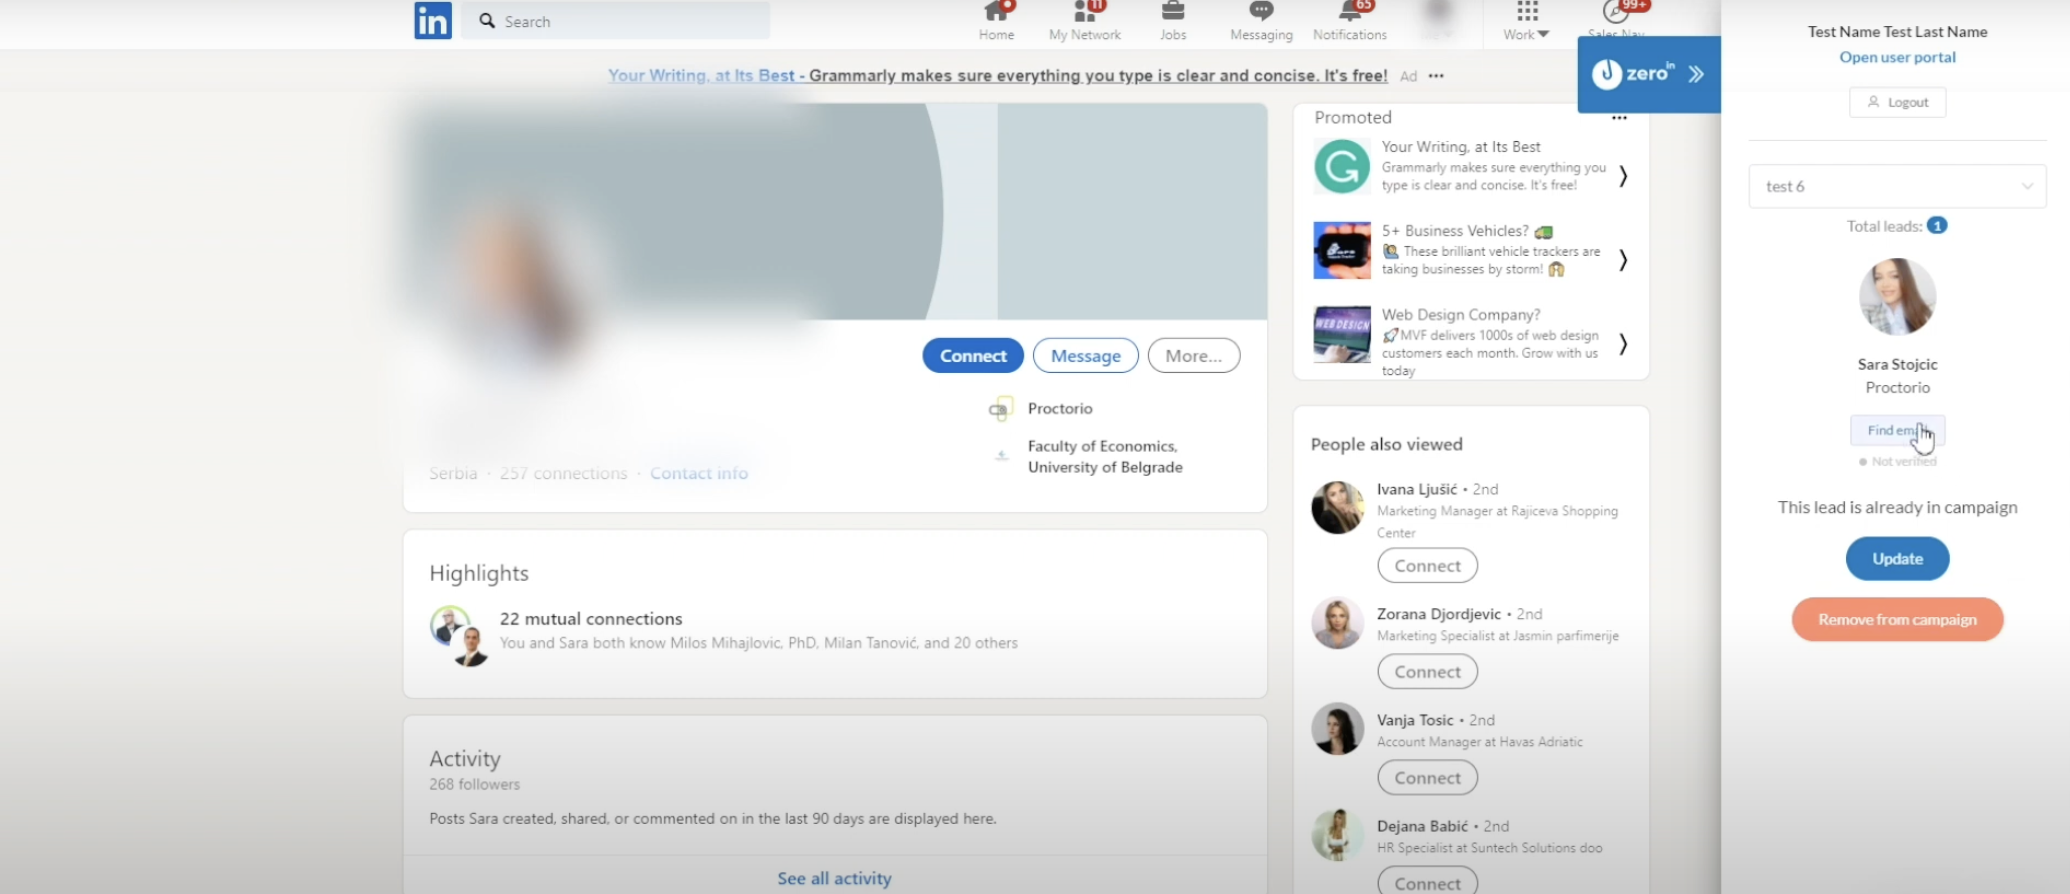
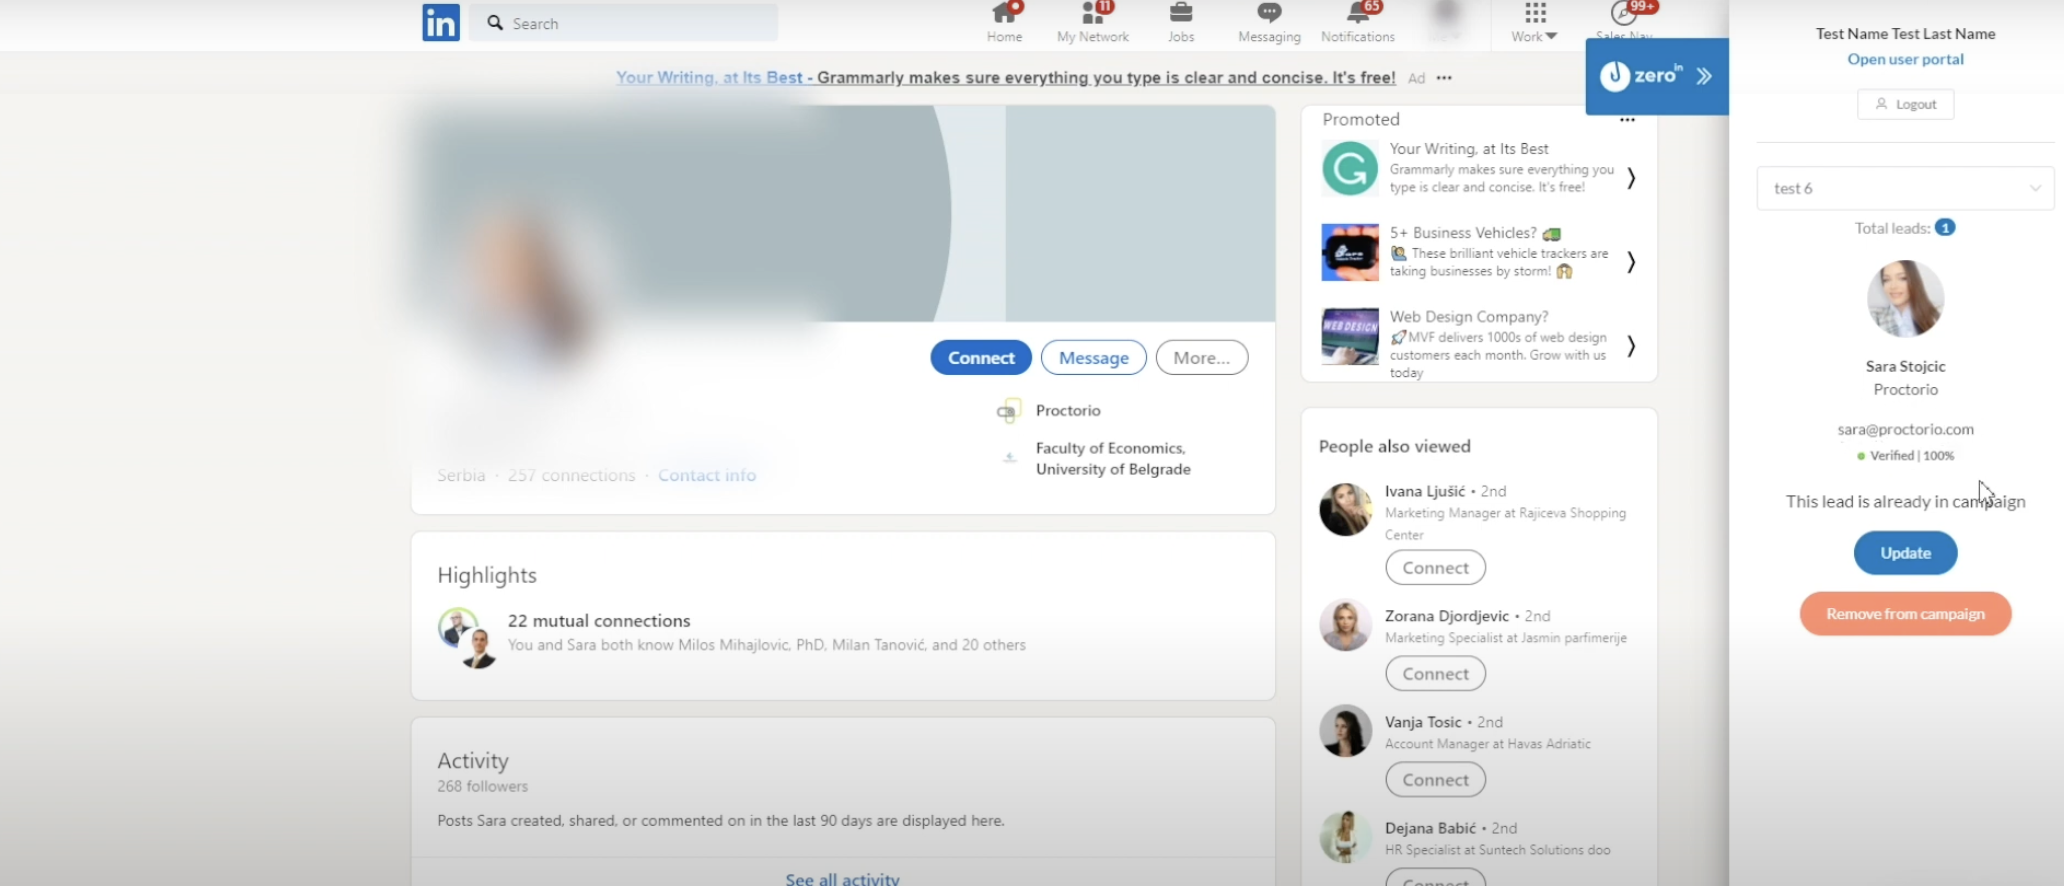
5. Add them to your campaign, and simply click the “find email” button. A ZeroIn credit will only be spent if you manage to find AND verify the email address.
Ta-daa!
Did you know that ZeroIn also enables business email discovery in bulk on LinkedIn?
ZeroIn also lets you do bulk business email discovery on Linkedin by matching the person’s LinkedIn profile with our contact database, saving you valuable time and further expediting your prospecting process. Here’s how that’s done:
1. Go to LinkedIn, open search and use the filters to hone in on your target buyer personas
2. Open the ZeroIn Chrome extension and select or create a new campaign where you want the contacts saved
3. Set the starting and ending pages and the time-out minimum and maximum. BUT, remember to keep the minimum time-out at 5 seconds or higher to prevent LinkedIn from flagging your account as a bot.
4. When everything is set up, ZeroIn will begin matching the information from your LinkedIn search with its own database. Depending on the number of contacts you’re searching for, this process may take some time. You can watch the progress in real-time on the search results page, where the tag “in campaign” will be added to prospects as they are matched.
5. Once the data matching is complete, you can then go to the ZeroIn User Portal to further manage and analyze your leads.
Now it’s time to open the ZeroIn user portal and verify your prospect emails.
6. In the sidebar, click the “open user portal” button and you’ll be taken to the page where your prospects are located.
7. You can choose to find the email of your prospect in bulk by selecting all of them, or you can verify them one by one by matching their email against the ZeroIn database.
a) To bulk select your prospects, select the contacts you want and then in the drop-down menu on the top, choose the “Add to email find queue” option. You can track the progress of this process in real-time.
b) Alternatively, if you want to find emails for specific prospects, click on the “search” icon next to their email field in the contact table. ZeroIn will automatically verify the found emails and give you a confidence percentage on each email.
The ZeroIn’s database contains over 17 million business emails and phone numbers from all around the world, so your chances of success are high.